Pages

Sunday 30 August 2009

Archival storage - canvas

The first post I made covered archival storage of art on paper. Now we move onto Canvas. Most of the archival qualities of canvas paintings come with how they're created.

Supports grounds and gessos

If you've got a painting on Canvas, you're in luck. Much less work. HAHA! There are very few steps to keeping these safe and preserved. There are 2 aspects to consider: your foundation and your varnish.

Depending on the paint you are using (acrylic or oil) you need a proper surface to paint on that will help keep your painting alive for a long time. In general Linen and Canvas are both fabulous. If you are stretching it over stretcher bars, make sure they're sturdy enough for the size. larger paintings should have gussets, cross braces and heavy duty bars to support them. This will prevent bowing and breakage.

The gesso or ground you use has to be appropriate to the paint you are using. Example, using an oil ground for acrylic paintings could lead to many problems including sagging peeling and rotting depending on the type of ground. Always use an acrylic gesso for acrylics. You can use an acrylic gesso for oil painting as well, but make dang sure its dry, and don't mix it in with oil paint. Oil paint can safely go on top of acrylic but not underneath or mixed in.

For oils use a ground for oil paints. I wont go into them here because gamblin has a fabulous write up here on their products that says more than I could, and says it better.

Be cautious of using surfaces like Masonite that can be oily and highly acidic. Painting on cardboard is also a terrible idea if you want it to last.

Varnishes

Acrylic paint in has a polymer base with pigments added; Its plastic with colour. That alone makes it about more durable than you probably realize. If you've chosen artist quality paints and used light fast colours you're doing great and probably don't even need a varnish. There are a few aesthetic considerations in regards to a finishing layer. Sometimes different pigments will vary the sheen of your work in which case you might want to give it a later of a varnish or a layer that will at least unify your sheen. you can get several products. A plain ol' Acrylic gel medium (polymer medium) with your desired sheen (gloss, matte, semi gloss or satin) makes a great final layer for acrylics. Best of all its the same material that your paints made of, only clear. it will make your bright and dark colours pop if you use a gloss. If you use a matte gel keep in mind the matting agent added to this is not clear. so over dark colours it might look milky.
As always test on something else first.
You can also get some varnishes to block some of that hideous UV that kills colours. Golden Paints has a product called a UVLS varnish. It comes in gloss and matte and blocks UV light from attacking your colours. This is useful if you are selling your piece to make sure the buyer gets the most of the work.

For oil paintings on canvas, you can get many resin and solvent based Varnishes. This gets to be a complicated topic sometimes, but in general I find Gamblin to be the most reliable resource for Oil painters out there. They have a synthetic resin varnish, and many types of damar and mastic varnishes. Damar has a reputation for yellowing over time. Gamvar is a very reputable product for an oil painting varnish. The main thing to look for is "removable" and "non yellowing".
Most varnishes are "removable". This is a frequently misinterpreted word. It's not removable by you, it's removable by conservationists. It means that the people restoring your painting professionally if there is damage or you're 100 years dead and they're restoring it, they remove the varnish layer to fix and restore the painted layer.

For acrylic paintings at least (I've actually not heard of this with oils) you need an isolation coat if you're going to varnish. and Isolation coat is a layer of non removable product applied between your paint and your varnish. I've generally used a polymer medium since its clear and I've used them in the painting anyways. That works well.

Storing
There are a few ways to store your paintings. you can either leave them as they are, stack and store them with barrier paper. be sure to leave space between each painting. Paint must breathe to be happy. You can use any number of things to space them out, little bumpers stuck to the back corners of the canvases is good. As long as you leave air flow you're okay. Then you can stack. Make sure to not leave anything leaning on the canvas itself as it will cause dents and rips over time. always stack then with the weight on the bars.

If you do end up with a dent in your canvas, or your canvas looses its tension you can get a product called "canvas tite" that you can apply to the back of your canvas to return some tension. Its best to avoid the problem though.

The other option is pulling the canvas off the stretcher bars and storing it rolled or flat. This is a good option for space saving but requires more care.
You should roll them with tissue paper with the paint side out, to prevent bulking and cracking of the paint, and store them in a tube wrapped in acid free tissue. let it breathe though.

If you store it flat, use the tissue again and store it in a breathable location. a drawer perhaps.
Wood drawers leach acid so be sure to treat the inside to neutralize the effect.

Never trim the edges of a canvas pulled off stretchers. if you ever need to re-stretch the canvas onto bars you need that space to pull and staple. (canvas stretching is for another post).

That's about all I can recall about canvas off the top of my head. Again do research on your own, and check manufacturers websites.
Archival art storage - Paper

So you've created a masterpiece and now you need to store it. But how do you keep it looking like new forever?

The first step is choosing art materials that can stand the test of time. Use artist grade materials, and light fast colours (more on that in another post someday!). Always work on Acid-Free surfaces (paper, canvas etc) and finally; take care of the final product.

The 3 main factors in damage to art work are light, temperature, and acidity.
When storing your art work there isn't much consideration for presentation, so here are some things you can do.

For art work on paper

Mat your art work in conservation or museum grade mat board. you'd need a full back mat, and a front mat with a window hinged together with Acid Free Hinging tape. Use the same tape to attach your Image to the mat. this does 2 things: Keeps the paper safe and flat so it wont take damage from the outside world, buffers against acidity and moisture (air moisture, not your pop or juice), and leaves some space between your art work and what you are storing it in. you don't want the surface of your art rubbing on something, especially if you have work done on particularly soft paper or a smudge-able medium like pastels or pencils. Any mat board you use should be at least conservation standard. If you're using un-buffered or merely acid free mats, then that doesn't mean acid cant be introduced to the mat board, and consequently your art. Watch for "Acid Burn" on the edges of your image where your mat touches. it looks like light brown burnt edges. also check that the bevel on your mat isn't turning brown. That's acids baby!

You can then store or display your matted art in an archival plastic bag made with polyethylene or polypropylene. If you are storing you might want to slip a piece of Acid Free chloroplast in there to give it added rigidity, and then store it in an acid free storage box. There are some on the market for this very purpose but anything acid-free, lignin-free, and buffered will do.

make sure its stored in an area that wont get light, or moisture to prevent fading and molding. Your art work should last a life time!

If you want to store multiple images together, or for another reason need added protection for your art work, there are a number of inexpensive products you can use.

The Acid Free Tissue is a great product to fold around paintings, or put between 2 paintings when storing short term. You might also want to place a layer of this in front of your art before storing it in the plastic sleeves. That way if something happens and damage does occur and your painting decides to stock to whatever is closest, its the easier to fix tissue and not the plastic sleeve.

Barrier paper is a 2 ply sheet of archival paper that is often used in framing, placed between to matted work and the back board. Its great because its a bit heavier than tissue so it really stays put.

Blotter paper is a highly absorbent heavy weight paper that is conservation quality. It's very absorbent.


Varnishing and Fixatives for Paper

If you are going to be storing pastels, pencils or charcoal work, its a good idea to give it a couple coats of a workable fixative. Make sure the fixative is non yellowing, and test it on scrap test paper before using it on your masterpiece (this goes for everything you do).

there are also some varnishes on the market designed for watercolours and gouache paintings (in addition to ones made for acrylic and oil). They're usually in an aerosol can and require several coats. If you can find one that has a UV barrier in it all the better. These varnishes should protect against light, and physical damage (to a point) and also act as a paint fixative.

Storage sleeves and boxes

Instead of the crystal clear bags, and storing things individually wrapped, you can also get some portfolio storage and presentation folders. Itoya has some great products for this! if you do go this route make sure any portfolio you get is PVC free for the plastic, and acid free and buffered sleeve inserts )the usually black piece of paper inside each sleeve). you can get them either attached in the book or with removable sleeves. Just make sure you choose the right size for your art. Too big and they'll slip slide all over the place and get damaged, too small and you force it in and ruin it. The sizes listed on the books are the paper size that it can hold.

you can also roll and store large works in PVC Free plastic tubes. I'm personally not a big fan of this method as I've seen in my job people trying to uncurl these pieces to frame them and causing huge damage in the form of rips and creases to it. if you do store work rolled and need to flatten it out please use care! don't force it into a flat shape before it's really. (When babies are born, they take a while to uncurl - if you pull a painting from a tube, its your baby! Give it the time your baby needs.) Gently un roll it, a little but, have someone hold the first edge while you unroll the rest of the way. if you have something flat the same size as your image lay it on top to flatten it out as you uncurl. don't force it or you'll get creases.( try to use a barrier paper or something between your work and the surface you use the flatten). You can also roll it back on itself the opposite way it was rolled. this is trickier, especially with heavier paper, but you can leave it curled backwards for a couple hours and it will be almost flat. If its a really precious work, leave it in the tube and hand it over to a professional.

Definitions

Acid Free: This means that the paper is free of acids that will cause it to deteriorate over time and damage the other items that it touches. Good to note: If a product doesn't say its Acid Free, it's not in most cases. Except with pens, when most pens are acid free but they don't mention it.
It's a misconception that Acid Free is more expensive. In Most cases its on par with prices of acidic products but only sometimes slightly higher. Given that it expends the life of your work, its an acceptable cost.

Non Acidic: Non Acidic does not mean Acid Free! It means its been buffered to an Acid free level (maybe even only on one side) and that it will return to an acidic state over time.

PVC free: Refers to plastics only. PVC's present in plastic will cause deterioration over time. it will turn into goo. Rubber bands have PVC in them and you can tell when you've had something in an elastic too long it gets gooey or brittle.

Buffered:
has an alkaline reserve, usually 2-5% calcium carbonate. The buffering counteracts the effects within the material or in the environment, providing long term protection. Buffered paper should have a pH neutral level of 7.5 to 9.5

Un-buffered or Non-buffered: lacks the buffering reserve to prevent future acidity. It is used with materials that are sensitive to a higher pH level. Un-buffered paper should have a pH neutral level of 7.0 to 7.5

pH level: the measure of acidity and alkalinity. The scale ranges from 0-14, with 7 being neutral.

Conservation quality: it is both acid-free and lignin-free, and is inherently neutral, not merely buffered to a neutral pH level.

Museum Quality: The standards set by museums for storage and presentation. The absolute best of the best. Often used interchangeably with conservation quality, but the terms also very by manufacturer (in regards to mat board).


Do more research

There is a Website called FACTS: Fine art Care and Treatment Standards. This is an unbelievable resource.

Check out the manufacturers of the mat board and products on the web. Most good companies have a website with information and FAQ's.Ask Questions, get answers. Google is your friend.

Check your art store: if you're local art store is any good their staff will be knowledgeable and hopefully artists themselves. Opus Framing and Art is the absolute best and the website has a great blog. Ask Questions! The staff at opus are an endless resource for me (and being staff myself, I've become a resource for others obviously. We all share one thing: an obsessive knowledge of art supplies!)


Well I think I've covered all I can think of for this right now, stay tuned for more! There's just too much to say!

Monday 24 August 2009

verve gallery auction

MY art is up for auction (as well as others) on Ebay right now! proceeds go to the Boys and girls club of Canada! This is a collection of pieces that were painted by 6 artists of various backgrounds. The pieces were painted live at the RDS Skate Supply Lower Lonsdale Block Party and Skate Competition. Each artist was given a 3' x 4' canvas and some spray paint (compliments of Opus Framing and Art).

my painting is in it:

Charity Painting by `guruubii on deviantART

View Ebay Auctions: [link]

My painting for auction: [link]

Please pass this along and spread the word for the sake of the chillin's and for my ego. HAHA! its for a really good cause :)
Thanks guys!

Monday 18 May 2009

Encaustics Part 3: Painting

Part 1: Tools
Part2: Making Medium

Part 3 is here, Painting with your mediums!

There are many ways to paint with Encaustics. The most tutorialed was is the method of applying the wax to and Iron and then working it onto cards. If you go on youtube and search encaustic painting, you will get flooded with those tutorials. very few of them show how to do encaustics with brushes, and even less show the way you can do realism... that's another story. I've decided that that has to change. One day I'll tackle youtube, but for now, I'll show you here :p My focus lately has been on abstract. Maybe someday i'll gather more skills and tools and start doing real portraits, but ya, I enjoy doing abstract as a way of having more freedom from things like anatomy and structure since thats always my focus in animation and illustrations thatI do...
But I digress, lets move on.

First you have to gather your tools. In my picture I have my collapsable Winsor & Newton Easel, complete with wax drips all over it, my pucks of Medium, a metal bowl, brushes, paints, a surface (cradled panel), scraping tools, my hot palette and frying pan.


First thing to do is set up your hot Palette. However you do it. I set mine over 2 burners on my stove until I can get a real hot plate. My frying pan is my double boiler.


So once your medium is melted, you can start. I used 2 pucks on this painting. I melted , and just remoulded my left overs. you can always add more to the melting pot if you are running out. Spoon some of your melted medium into your mixing cup. I used a silicone muffin wrapper, not a great idea. Metal cups work better LOL. the flimsy sides are a little annoying. you can now colour your wax by either adding little blobs of paint in, or mixing in powdered pigments. In this case, I'm remelting a Puck I had already from my last painting. note, Powdered pigments, although they present that inhalation hazard, mix in much easier than oil paint.

You can start painting once your pigments mixed in, if you're brush is already hard with wax, just set it in your cup until it melts down and softens again. you will see, as you do each stroke, it hardness almost instantly. Each stoke will be exactly as you lay it down. I usually paint with the easel set upright, but for this tutorial I painted flat to make it easier to see. the light in my kitchen is wretched.

....
Start painting! You can either do strokes as I've shown, you can dab it, you can spread it on with a knife, scrape, carve and manipulate the paint in anyway you want. In between layers, you need to fuse the layers with heat. that's where the Iron comes in. you can use the iron as much, or as little as you want. you really just have to heat enough to fuse the layers, you don't actually have to change the appearance. I used the heat to really blend my wax around and flatten out all the brush strokes. You can also use a heat gun to fuse. I found that i lacked patience for the heat gun as you need to use a very steady back and forth motion. I just blasted smoldering holes in my wax HA!
..

So keep going, adding more layers, fusing in between, add some layers of light over dark, or dark over light, it will all work. You can see me building up layers of red and yellow (and even some plain unpigmented medium) in the next sequence of pictures.

....
Inbetween each layer I took the iron, and fused and manipulated the wax. pulling the iron in different directions will pull the wax in different ways as well. Its important not to put too much pressure on the wax though, or you'll melt right back through to your panel. This iron is pretty heavy so its hard not to do that. a light iron is a benefit.
The last thing i did was drip that wonderful blue down the corner. I thought it needed something punchy on it, and I also wanted to show that you can use the properties of the wax in the way we are more familiar as well. the Drips are like my homage to the glorious wax that bees built for me :D


When you are done your painting, and its all cooled and dried, you can take a soft lint free cloth and buff your wax. Don't use the ass of a teddy bear though, it will leave balls of lint, especially if your medium has a high ratio of beeswax and is soft, it might still have sticky spots that cling to fuzz. Then you are done! take a good photo of it outdoors on a cloudy day and you will get a good photo of its true colours, then you can post it on Artician, or...I guess dA too if you wanted.

Next up, caring for, shipping and storing encaustic paintings. WOOT!

Sunday 17 May 2009

Encaustics Part 2: Making Encaustic Medium

See step 1: Tools you will need

When you start in encaustics the first thing you need is Medium. This will be your base, Vehicle, whatever you want to call it. you can start out by buying the medium instead of making it if you find this process intimidating, or if you are unsure if you want to carry on in encaustics. R&F has a great line of encaustic supplies. If you plan to do a lot of painting, the cost will add up. you will go through a lot of medium in encaustics, so its cheaper to make your own medium in bulk. R&F is pretty pricey.

Please be advised, if overheated beeswax and resin can produce toxic fumes. take care not to ever let your mixtures get over 225 degrees. Wax melts at a fairly low temperature, and resin melts at 200 usually. so keep it lower rather than higher.

if you are using the technique of painting I use, you will use a lot of this Medium. I mix my colours as I need, and then save the pucks of colour if I have any left over. I can remelt later if I need that colour again. I can add more or less medium to change the transparency if I want. If you are using the technique of painting with the actual Iron, you will need to pre make the colours in pucks. I'll mention the stage you would do that in.

Lets get started.
First thing you should do is prepare your materials.

Gather your tools: a double boiler (or a mask shift one. I used a camping pot in a frying pan with water in it.), your muffin tin or liners to mold your medium pucks (cakes), a mortar and pestle, or baggies and a hammer (to crush your resin), your beeswax, your resin crystals, your scale, your spoon/ladle, thermometer, and hotplate or stove.

Measure out your amounts of wax to resin. You need to think about the ratio you want. 8:1 ration wax to resin is good (I part resin to 8 parts wax), but this is totally personal. the more resin the harder your wax will be, the less resin, the softer. work with what works for you. I wont go into actual measurements here, because I just eyeballed mine really... :p

Resin: you need to crush your resin into a fine powder. you can do this a couple ways, in a bag with a hammer. I suggest covering it with a towel to avoid dust flying, because you'll hammer the heck outta the bag its in. you need to crush it as fine as you can. the white powdery part is ideal. the big rocks here are going to have you over a stove for 3 hours melting it... make it fine like a dust. Resin take a while to melt, do anything you can to help it along.


Wax: I used beeswax from The honeybee Centre for my medium today. I got a big 15lb bag of it, chipped from a huge block. I liked it chipped off because it was easier to deal with. I have big blocks right now that are just too laborious to spend the time breaking apart. HAHA! my wax was a rich yellow. I adore it.

You start by melting this in your double boiler. Set the heat to a medium temperature. As you can see in my picture, I wrapped my frying pan part of my double boiler in tin foil. I don't remember my reasoning. but it sure made it look rugged. The pot the wax is in, is a camping pot. The handle gets hot. Take care not to burn yourself obviously.


You can see from this next picture, the wax is a warm rich yellow. I love this part of the beeswax, but if you want to have a white base then you can use filtered wax that has had the coloured pollen removed. Different places that make beeswax will have different colours from bright golden yellow, to dark almost brown. This has to do with the pollen in the wax. Different regions have different plants that the pollen comes in. It's awesome!
Anyways, Melt your wax until its completely liquid.


Once the wax is completely melted, you can add in your resin. I'm impatient and didn't crush my resin well enough so mines all lumpy and took ages to melt, so don't skimp on the crushing. here is the resin in the wax. It will be sticky. remember, its tree resin AKA, SAP... It will become sappy and sticky. just stir stir stir and give it time to melt. Keep the temperature around 200 degrees, but never over 250 degrees. Don't rush, you'll just burn it.


Soon it will be all melted. See, it looks like melted wax, but the resin is adding the properties you need. more brittleness, and polish ability, and less oxidization.

If you need to add more water to your double boiler, heat it up first so you don't drop your temperature. It will make it take longer.


Once you have your medium all melted together, ladle it into your moulds or pour it in. I used these handy little silicone muffin 'papers' for mine. they keep their shape. but don't over fill. 2/3rd is best. these ones were bunched together so they were all funny shaped LOL!
As the cakes or Pucks cool, they will turn lighter and opaque.
make sure you peel them out of the cups only if they are fully set. you don't want to get burned by shoving your finger in a half molten cake. If you are wanting to make pre pigmented blocks, you would add the colour in the mold when its still molten. stir it up to mix in the colour and let it set.


Once its hardened I like to heat a knife, and carve an M into the top of it. This way I know it's a cake of Medium. If I have to break down my wax into pucks later, or I make a colour that's similar I don't want to mix them up.


Sometimes the resin will have some bits of tree in it. you will see this in the melting process, but don't let it concern you at all. once you pour the pucks into the moulds and it set,s the impurities will settle the the bottom. you can either carve the layer off, or your can melt it and wipe it off. either way, its easy to remove.


This is my pile of Pucks. They're a nice yellow colour, and they're solid and ready to use in painting. I compared it to the R&F encaustic medium I had, and its very similar, so I guess I did a good job in that :) mines just a bit yellower, which I like more.


The 3 pucks in the middle are some leftover R&F encaustic medium I had. the coloured pucks are my pigmented medium from a previous painting I had worked on. I just save my left over colours by letting them set in the mold and popping them out. I store them in the art bin.

And that is all there is to making your encaustic medium! Its fun to do.
Be careful of possible burns, and work in a well ventilated area, and all will be well.

Next blog will be Using your medium, and creating an encaustic painting :D stay tuned

Encaustics Part 1: Tools you will need

My good friend Limnides has expressed an interest in encaustics that I've been raving about, so this has prompted me to get my ass in gear to make my blog posts about encaustics! Yay! I'm going to do separate blogs for each section and make it as thorough as possible.

For this series of blogs, I'm going to not only put in my own experiences, but I'm also going to be pulling in resources from some research I've done, just to make it as well rounded as possible. I'm also going to go in depth into each of the tools you need as well. A lot of the time i get lists of tools, but not why they're used so you can't properly improvise if you cant find them.

Here we go, If you want to Make your own medium and paint with encaustics, here is a list of the tools you will need:

A kitchen scale. Something that will measure in small increments. something like a weight watchers scale or something. Very cheap at wal-mart or something.

Mine was fancy, and suited my style. HAHA! it was $15 at value Village. The top dish comes off and I use it for all sorts of things, and its easy to adjust it :)

anyways, you need to be able to read it, and you need to be able to measure fairly accurately. I don't really need it for more than a pound of wax at a time, but depending in the quantities you want to make of medium, you might need something that goes higher.

A "hot palette" - This is going to be whatever you can come up with. A Griddle with a flat surface with adjustable temperature, or in my case, a Cookie sheet wrapped in tinfoil placed over the 2 front burners on my stove. Griddles tend to work better because of the more uniform heating of the surface.

A thermometer - to monitor the temperature of your wax. don't ever let your wax or resin get over 225°. there is no need. The resin in Medium when you make it can get around 200 to melt, but other than that, keep it as low as possible to keep molten, but Never boil. Beeswax melts at 178°, so it shouldn't be much more than that. Just keep it real people :)

Paint Cups - Little metal cups to melt wax, medium and pigments in for each colour you wish to use. Mini load pans, cupcake pans, and other sorts of metal cups do wonders. I went to the thrift store and picked up all the little camping cups and stuff I could find. These will go on top of your "hot palette". they need to be wide enough to fit in the width of whatever you are painting with. This is not necessary if you are painting by applying wax directly to Irons. This is for the method of painting I use, that requires brushes. If you are applying wax on irons, you need to pre make or buy your blocks of medium with Pigment in them. more on that later.

Tacking Iron - Or any kind of travel iron that has no holes. a steam iron wont do. having said that, I searched high and low for such a tool, and besides the Iron you can buy for encaustics specifically, I have found nothing. I've been to every thift store, looked at travel irons... Everything has freaking steam holes... So, I modified ours. I wrapped it in tin foil. In the future I may make a more permanent modification with some actual metal plate, but for now the tin foil is working. Its a bit heavy. If you do the same thing, try getting a small travel iron.

Do not leave water in the iron if it is a covered steam iron. Noisy strangeness occurs! HAHA! Love the wax dripping off the bottom of mine? HAHA! my sister didn't :) you need to use a low setting.


Brushes - I'm not crazy! Its true, i use paintbrushes. I learned this technique for encaustics from 2 amazing artists, Suzanne kay, and Maria Josenhans. The brushes need to be natural hair. I generally stay away from natural hair because there is a huge amount of cruelty in the animal hair/ paint brush industry, but I made an ethical exception and got these Escoda Hog hair brushes. They're a great investment. and you never have to wash them. the hardened wax does nothing to harm the bristles. You cant use synthetic because they will melt and stink. Get only Top quality brushes! the last thing you want is embedded little hairs in you painting... or is it?


Silicone Muffin tray or wrappers - you can also use things like metal muffin tins, or the like but if you want to make pucks of medium or pigment blocks you need to pour them into some kind of mold that you can pop them out of. Silicone is the best for plain ease.

Other items: a Ladle that is all metal to spoon your medium into the molds, a little knife to clean up the grit off your pucks, and a mortar and pestle to grind resin if you are making medium (you can also use a bag and beat it with a rolling pin), a double boiler is good (or a makeshift one. it buffers the heat on the wax so it wont burn).

You will probably find other tools to create various textures and effects as well. Just remember that once you use something for encaustics, Never use it on food again! you must dedicate your tools to this art. I suggest buying things specifically for it.

Cleaning tools is easy, just wipe them off when they're hot... I tend to let the wax harden on them.

Now you have all the tools, you'll need supplies as well. you know, to paint!

Surfaces:

You need to use a rigid support to paint on. I used ungesso-ed cradled panels from Opus Framing. you can use some primed surfaces but I prefer the raw wood look. You need a porous surface. Acrylic gesso will not do. stick to wood panels, or canvas wrapped panels if you want the texture.

Medium :
If you aren't making encaustic Medium yourself, you will need to have some. Un-pigmented medium can have pigments mixed in, or you can buy the coloured pigment sticks as well.
You can also Tint your medium with Oil sticks, or Powdered Pigments. When using powdered pigments, use a mask. for the love of god, do not breathe that stuff in. Turn off all fans and close breezy windows. you want ventilation, but you need to not have that stuff blowing around. If you are scooping Cadmium red and a breeze blows it in your face, you are potentially in trouble.

Pigment:
I use oil paint, but beware, not all paints can be heated. If your colour contains cyanide, or other known toxic chemicals, do not heat them! I will have a list of pigments (with the pigment code: IE: PW4 listed.) to avoid here:

PW4 : Zinc White/Flake white - Sometimes still contains lead, but it also does messy strange things when heated even if it is synthetic. Avoid.

PB27: Prussian blue - Contains cyanide. Avoid.

PR83: Alizarin Crimson - The "permenant alizarin" and other hue pigments are okay, but the PR83, alizarin genuine pigment is not. Avoid.

PBK7.9 Ivory Black - Uses burning to create the pigment, so it reacts funny to more heat. Avoid.
PBK1.6 Peach black - Same problems as PBK7.9.

"Madder" & "Lake" colours should be avoided because they use the same chemicals/materials as the alizarin, and are often fugative.

Phthalo Colours are OKAY to use. Many believe they are not, but the mistake is in believing they contain cyanide, they do not, they contain Cyanine, which is okay to heat.

Cadmium's - the heating of cadmium's actually isn't the problem, the colours are just unstable. (Cadmium's are actually heated to achieve different colours to make the original pigments). I've not had any major problems yet using them.

Hansa Yellow - In  discussion with www.encausticpaints.com they mentioned that hansa yellow gives off toxic fumes at 300 degrees.

A note on using Oil paints:
Linseed oil in Oil paints makes your wax a bit softer too, so keep that in mind when you are using it. Once you get making your own mediums, you can modify the ratio of resin to wax to compensate for that. also putting your paint on tissue or paper towels before you use it will absorb some of the oil.

If you are Making your medium:

Darmar Resin Crystals (NOT damar Varnish). you want the resin crystals to melt into the wax. this created a higher melting point for your paintings so it doesn't melt if you turn on the oven to make dinner, and it also makes your painting polish able. It also stops the oxidization of the wax which causes the "blooming" you will see on beeswax, that's the white dusty stuff on your candles. you can always buff up your paintings with a soft cloth anyways if you do get bloom.

Beeswax (do not get bleached. either use raw, or filtered. Bleaching not only is toxic when heated, but it will yellow. Filtering removes the pollen that colours the wax, bleaching only discolours it, the colour will come back in time, but you'll be dead before you see it for heating bleach.) I personally like the rich colours of Pure beeswax. I have two sources for my wax. HoneyBee centre in Surrey BC, and Planet Bee in Vernon. both have reasonable prices, and PlanetBee ships. Honeybee Centre has a more golden yellow colour to the wax, where planet Bee has a darker colour.

You might want to try other waxes, to get other properties from them, but I like beeswax for its wonderful rich colour, and the wonderful scent. Encaustic paintings are an all over sensory experience to view and to paint. If you haven't seen, touched, and smelled an encaustic painting in person, you haven't lived. You must see one in person to fully appreciate the depth that layering the wax achieves, the feeling of the wax, and the smell of it.. Its amazing! To reduce cost if beeswax is a bit pricey for you, add up to 50% microcrystalline wax and you will keep those properties in beeswax that we love. Carnauba in small quantities (10% or less) will add some brittleness to to the wax, but paraffin is too brittle, and is a petroleum product. Boo.

Thats about it for supplies for now. If I think of something I miss, I'll come back and edit and add to this. And I'll get that bad pigment list updated ASAP.

Next up: Making Medium!

Saturday 9 May 2009

Plein-Air wet canvas Carrier (tutorial)

So, We went painting in Stanley Park last weekend and I needed a way to carry my paintings to and from the park while they were still wet (oil paint). This posed an interesting problem for me. I could buy a 10$ wet canvas carrier, that only carried 2 stretched canvases of equal size, or make something else. I prefer painting on a rigid surface, so my friend Maria mentioned a book she had that had made a box to carry them taped or mounted on boards. Well not being a carpenter or good with a ruler, I modified this idea.

My wet canvas carrier is extremely inexpensive. Each board is only 2-3$ and the spacers are only 5 cents each. here is what you need:

Masonite, or hard boards cut into the sizes you paint on giving a generous space around the edges. Example.: My canvases were around 10x10 on a 12x16 board size.

Rubber Framing bumpers. they have to be the dense rubber kind, not the foam or felt. They need to provide enough space for the canvas, and the paint with some air flow.

a strap and box (optional) the strap holds it all together, and a box to carry it in wouldn't hurt, but I didn't have one, I just slipped it in my backpack.

Okay, Here is what you do!

Step 1

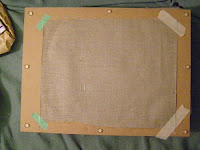
Take your Masonite, and put about 6 bumpers on it. One on each corner, and one on each side of the long side (seen in the figure to the left). Save one Masonite board that you don't put bumpers on.

As you can see I've also taped on a piece of Primed linen canvas as well.I'd recommend more tape, but whatever works for you. Just keep in mind, the space is limited so the flatter the better.
The Linen I bought in a large roll, and cut into the desired pieces. It's 7 oz, clear primed. I got it at Opus Framing and art. Regular price at the time of purchase was a steal at $215 for 5ft by 10 metres. I got it on sale, and split it, and the cost with a friend. I had 5 meters for $75 and it will last a LONG time! LOL!

Anyways, add the bumpers to as many boards as you think you can carry comfortably. each board will hold one canvas, unless you put one on the back of each as well, but if you do an impasto technique, you might find yourself wanting more space, or having paintings rub and transfer. It's best to leave enough space for the slight bowing that accidental pressure will cause.

Step 2


Once you have all your boards done, you just have to stack them together (see above photo) as you can see it leaves just enough space for the painting in there. but the top is exposed. Good thing you saved that piece of extra Masonite. it becomes your lid. you just lay it on top of the top boards bumpers, sealing everything in.
Now I experimented, because I ran out of Masonite and I wanted more paintings, and so I tried Chloroplast... No go... It's not rigid enough to properly protect the paintings. so Pretend in all these photos that the white board is actually Masonite!
This is the result of using Masonite.. .don't worry. I had put a bad painting there to test, it didn't ruin anything wonderful haha.

So anyways, heres the final bundle. (except the top would be Masonite). Everything is safe, now you just need either cord, or belts to strap it together. I used a belt, and cinched it around the 2 edges. Just make sure you wrap the belts or straps across where the bumpers are. If you don't you are creating pressure where there is no support. you will cause bowing and put pressure on your wet paint!
It's that easy! Granted this is a rather rudamentary thing, but for hardcore plein-air painters you could probably invest in a box or some kind, and get some grooves cut to slide your boards in, but for people with limited budgets and time, this would be perfect. I use it and its grande.

Hope this was useful!

If you want to make panel carrying boxes, I found a couple tutorials on that as well:

Wooden box

Foamcore box.

Tuesday 14 April 2009

Digital art

Something that's been coming up a lot in conversation lately is Digital art. I'm a varied artist(as most of you have figured out) and I have quite a bit of experience with digital art work. I've done professional Logos, vector graphics, and illustrations in various ways. My digital illustrations were published in a book, and my logos are in use by lawyers and hot dog stands.

There are a couple things I've learned over the years in regards to digital art.

1: People separate it too much from traditional art: it still has tools, and it still depends on HOW you use something not WHAT you use. I've seen people using artists quality paint, create crap, and people using student quality, create works of art that rivals the great masters. This goes for programs, and for tablets too. A better tablet won't make you a better artists, and most of the top of the line artists programs can do the same thing. I've used painter and Photoshop (up to cs3) and I will tell you, there is NOTHING in painter you cant do with photoshop, and vice versa. The difference: how the tools are laid out, and what work is done for you. The problem with programs is, it makes the tools for you. I say if you can paint with no undo button, and just one brush - you're a skilled artist, if you can paint something using every filter, brush, and setting in the program, you're an accomplished nerd.

2: Most people are going to hate me for this generalization, but I remind you that this is my blog. Most of the "painter" type art work out there looks the same. the same half assed unrefined BG's with over painted characters, women mostly, with shiny high points and extreme hot and cold lighting. Its like they've all learned from the same place, and never moved on. OH my biggest pet peeve is the lifeless wispy hair. Gimme a break. I'm sick of regurgitated floaty hair, more than I'm sick of 3d Animated films that would have been better in 2d.

3: Most people think that you can do things digitally that you cant do traditionally - that's only because you haven't figured out how to do it traditionally.

I'm not against digital art. It does have its place, that's for sure. some people don't have as much of a tactile connection to traditional art, and some people just are to addicted to not making mistakes, and some people just prefer it. I know there is a world of people out there, each one with their own reasons, but there is something I would like people to always remember

  • You can only learn by making mistakes - Undo Less, try to fix the problem as you would traditionally
  • Mistakes in art are sometimes "happy mistakes" Don't get hung up on perfection, no one has ever reached that level in the history of DNA.
  • Learn from others, but bring your own elements into your work - fuck wispy hair dammit!
  • Use the tools for your expression, don't express the tools - filters are rarely good things, textures are awesome.
  • Check out tutorials on the tools that the programs have, and experiment without looking at tutorials others have made on their techniques, at least right off. once you get a grip on the programs a bit, that's a good time to start checking our other tutorials, because then you take those techniques and incorporate into yours, and you aren't just following someone else's work.
Not too ranty I hope :p

Another day, another blog <3

Monday 6 April 2009

gouache

I thought I'd write a little bit about the gouache I use, and how it can be used. Not many people know this, but gouache comes in 2 forms. There is a and polymer emulsion gouache and a gum Arabic gouache. The main differences are that the gum arabic gouache can be rehydrate once dry, and you can make adjustments to your painting, and the polymer emulsion based is permanent when dry. Gum Arabic is the based used in watercolours, so you can use that as a guide to remember which one can be adjusted later. Gouache is almost always Matte in appearance, and depending on techniques can be painted like watercolours, or like acrylics. Its a very diverse medium!

The gouache I use is Holbein Acryla Gouache. Its a polymer emulsion based gouache made by Holbein (the German named company from japan lol). they're artist quality designer paints, and they come in sets or individual tubes. they have 2 series, A, for all the colours, and C for the metallic and some odd balls. one of the nice features of the packaging is the wide range of information they give you.

Permanence: They use a star rating for the permanence of the colours. 0-4 stars. 0 stars is a fugitive colour that will fade, 4 stars is a permanent colour. Gouache are a little notorious for not being light fast since it was created for designers and used for painting backgrounds for animated films, so the permanence wasn't an issue, the images were reproduced on film or in printing, but they've come along way in becoming an artistic medium and they've developed much better permanence for these paints.

Pigments: They list the pigments used to make the colours, so its easy to identify your paint colours. For example, you could look on the back of the tube and see the pigments used to make a certain mix colour, and then get just those colours to mix your own. Its a potential money saver, since you don't have to keep buying tons of different tube colours, you can just buy a few colours and mix the rest.

Munsell Score: They list the munsell score of Hue, value and chroma on each tube so you can more easily control your colours (again, these were made for designers, so that's of value to them but maybe not so much to painters of other types, but good to know)

These paints are water soluble, meaning you can mix them with water to paint with them, or you can mix polymer mediums with them for different looks. They are matte, and opaque. you can paint with them on a variety of surfaces. Illustration board is one of the best surfaces, but you can also use Bristol board, watercolour or print paper. Its fantastic for mixed media work. I've used then with my airbrush (and in my airbrush), watercolours, markers, pencil crayons, acrylics and painted sculptures with it. Its extremely versatile.

Here are some of my works that have used gouache in a variety of ways.


Hope that was a little interesting to someone.
Thanks!

----------------
Now playing on Winamp: Ralph Fiennes & Amick Byram - The Plagues

Wednesday 11 March 2009

Studio Safety

First off, The Gamblin Websites studio notes will always be the most awesome resource for your studio safety needs. Gamblin Is the best company for being engaging with artists, and making information available to the general public.

A good studio starts with good ventilation. Whether your studio is your living room couch or a huge loft, you need to have good air circulation. The air should be changed 10 times per hour. having an open window, with a fan blowing out, or an outtake fan pulling air out is the best way to work indoors. (working outdoors if you can, of course is only an improvement on this).

Most concerns with studio safety comes from solvents. This has lead to the belief that that oil paint is a toxic paint, and many people choose acrylics instead. This simply is an outdated misconception. The pigments used in creating paint are powdered and can be added to a binder to create paint. in the case of Watercolour paints, the binder is gum Arabic which is a tree sap, in Acrylic paints its a polymer, which is basically plastic, and in oil paint its linseed oil. Now lets for the sake of argument say you had a tube of each of these paints, with the same pigment. Which one would you rather (or your kids or pets) eat?

The one that you wouldn't want to eat is the plastic, I'm guessing.
So how is it that oil paints are more toxic? you cook with oil.

But when people start using solvents with their paint, this opens a whole new can of worms. you can wash acrylics with water, but oil paint needs turpentine right...? not necessarily.

On the 20th century the Odourless mineral spirits began becoming available for people to use. Gamblins "Gamsol" is a 100% pure odourless mineral spirit.
Turpentine Evaporates 5 times faster than OMS, so you can work around OMS longer without facing the affects that these chemicals have on the human body.

The other thing is, you can actually wash your oil brushes off, in more oil! That's right, wipe off your brushes then wash them off in vegetable oil. the vegetable oil will actually break down the linseed oil and get it off your brush with NO chemicals. I've heard many artists switch to this way of painting and have eliminated any solvents from their studios all together.

Now having said all that, Not all pigments are innocent. Cadmium's are pretty notorious for being a cancer causing pigment. Until recently though there were paints made from mercury and lead. Thank goodness most paint lines have stopped that, but you should always read the labels of your paint tubes. Most paint brands list the pigments used to create the colour, and you can find a pure pigment that way as well. Winson & Newton has a colour composition chart for their line of oil paints. I also stumbled on this neat Colour Index guide that looks pretty thorough, but my favourite resource is Handprint.com's Complete Palette.

So now that you know not all pigments are safe and innocent, what can you do? A lot! To protect your skin, don't use your hands to paint unless you wear gloves. That's why they make non toxic kids paints too by the way. Letting your children paint with artists paints is a very bad idea. Use a barrier cream when you paint. this stops anything from absorbing into your skin, and don't eat your paint :D .

To protect the environment, and your local water supply, never wash solvents, mineral spirits or pigments down any drains. Of course all places are different, but most places have water treatment plants that purify, and either recycle or dump it into the ocean. Some pigments are ground so finely that they can't be filtered out, so that ends up in our oceans, rivers, fish, sushi, tummies, and tumors. This also harms the wild life out there too, so beyond what you eat, we should be compassionate about the quality of life of other creatures as well. Humans do far more damage to the earth than we really should and we should take all steps we can to reduce that.

So having said that, what the heck do you do with your paint? There are many options. my very favourite is to use the Peel-Off Palettes. These are the best thing I've ever seen! when dry, acrylic paint peels right off, effort free, and the thin spots of paint can be picked up with the ball of paint as well, like an eraser. Oil paint can easily be wiped out, but I've also experimented with the peeling off aspect of them for oils as well! I found if i spread galkyd over the paint it acted like acrylics, and peeled right off. Solid paint in the garbage is way safer than liquids down the drain! Second to this option of disposable palettes. I don't like this, since it creates so much more garbage, but a lot of lazy or impatient people like them (grumble grumble). They are better than washing down the drain though. There is also the simple solution of using an airtight container to store your paint when not in use. then you never really throw out paint except in the solvent.
or water.

When you've got used paint solvent that you want to get rid of, there is a simple method you can do to reuse your solvent. You need 2-3 glass or metal jars with lids. When you paint, pour your dirty solvent/oms into a can, and let it settle. Once its settled, pour to clear oms off into a new jar. you can then reuse it until it no longer becomes clear. you can then throw out the sludge in your garbage, and take your OMS/Solvent to the recycle facility and recycle it with motor oils.

So there are some studio basics for your safety, and the safety of this ball of dirt we call home :)

Paint on :D

Monday 9 March 2009

Oil Painting - the basics

Oil Painting is something I stopped doing years ago, and now that I've gone back to it, I cant image why! Its an extremely versatile painting material, and the look of oil is amazing!

The basics:
What do you need to get started oil painting? I'll not dwell on this too too much, but there are some common misconceptions that I must clear up!

  • Paint: Artists Quality! I know student paints are cheaper, and in most cases you never see a problem but if you plan on mixing your colours, this is where student paint becomes your enemy. If you don't mix, no worries! My favourite oil paints are Gamblin, Windsor Newton, and Holbein. I use all 3, and they're all great! I never stick to one specific brand personally, because some lines have certain colours you cant get in other lines. The important thing is to have a paint you like to work with.
  • Brushes: Most oil painters use natural hair brushes. I don't. Why? Animal cruelty... enough said... I'm confused by people who won't buy a fur coat, but they'll buy a fur brush... Some brushes are fur used as a by product of the food industry though, so its not so bad but I still avoid it. At least the whole animal is being used in those cases. There are of course some cases where only natural hair will do, and that is Encaustics. Synthetic brushes melt with the heat of encaustics, which is not good of course. That aside, you can use Natural hog hair brushes, or synthethic brushes. Look for a bristle stiffness that will support the weight of the heavy paint, and will hold sufficient paint to work with it. I use the Opus Brand Mezzo brushes for my painting if i use brushes, but I tend to use knives more. Find something that works for you
  • Palette and painting knives: Some people use them, some people don't. Mixing paint is a hekuva lot easier with a small knife on your palette though. brushes for mixing can be a painful process, especially if you are mixing lots of colours. I like liquitex palette knives myself. If you are buying knives, avoid any with joints. if they're gunna break, that's where it will happen.
  • Palette: anything will do, but I personally enjoy the peel off palettes. I'm limited in space so mines a small one. I've tested it too, if you mix Alkyd with your paints, you can peel it off the palette cleanly. alternatively pour some alkyd liquid on your palette and when it dries it will pluck them all up. Peel off palettes are a more environmentally friendly, and YOU friendly way to clean up. I'll talk about that later on.
  • Solvents: Fuck Solvents. Use Odourless Mineral spirits to paint with, and clean your brushes. They Evaporate less than paint thinner and are therefore 60% less toxic. meaning you can paint 60% longer without feeling ill effects, and its odourless. Oil paint does not need to be a stinky toxic process. Still work well ventilated, and you are good to go. Odourless Mineral spirits.
  • Mediums: Some people paint straight from the tube, but I like mediums! I use Gamblin Mediums because they rule! More on that later!
  • Painting Surface: Stretched canvas or my personal favourite, cradled panels! I like the rigid surface. Pick smooth un-warped panels (unless you feel like repairing them) and pick tight stretched, triple primed canvases! (or stretch your own).

Paint:
I wont show techniques just yet, but I will go over the basics of what the tools do, then you can experiment with them to see how each will work with your own style and techniques. Somethings about paint you might need to know:
Titanium white: The best opaque white. good for mixing and covering
Zinc White: A good soft mixing white that is transparent.
There are so many whites, you should experiment to find the one you like. If you plan on venturing into the world of encaustics, be aware, zinc white does not like to be heated, and never heat Prussian Blue ( PB27) because it gives of toxic gasses. Winsor newton has a great colour composition chart.
Try to avoid touching your paint too much, and if you do get it all over you, use a barrier cream. I'm not a fanatic about this like some people, but pigments like cadmium can leach through the skin and cause cancers and stuff. Just be safe.

Little tidbits, lets move on to some fun stuff!

Mediums
I love mediums. I use Gamblins mediums not only because they're the most accessible for me, but because they're awesome. I'll list some of the ones I use, and their features and benefits.

Galkyd/ Alkyd: Alkyd resin speed up the drying time of paint. You can mix it in with your paint to thin your paint slightly and speed up drying time. you can also thin galkyd with odourless mineral spirits up to 50%. Excellent glazing medium! There is also a galkyd Lite which is lower viscosity and has a few different properties. In addition there is a galkyd slow dry, for working wet on wet for a prolonged time. There is also a fun galkyd Gel that will make transparent impasto! also good fun to use! I tend to stick to straight galkyd myself, since my main motivation is to thin the paint, ad speed the drying time!

Cold Wax medium: Cold Wax is one of my favourite things to play with. Its a thick white paste consistency, and is a matte medium. Its filtered beeswax dissolved in Odourless mineral spirits with a little bit of Alkyd Resin. On its own, it dries to a beeswax hardness, so it should be on a rigid support like a cradled panel unless you mix more alkyd into it to make it a more flexible film.
You can see this product in use on my painting Space Cadet. Its mixed with pearlescent pigments. See the close up here. Click to enlarge.(please also note the yellow paint, bubbly and wrinkled. This is what happens when you mix too much linseed oil with your paint.)
You can see it dries semi opaque and is matte. Its fun to mix with paint as a matting agent, or to create impasto or layered effects. You can see it in use more discretely in my 2 Toxic Forest Paintings Green and Purple.

Linseed Oil: Linseed oil is the base for most oil paints (with the exception of the radiant series of Gamblin paint which uses safflower oil). You can use it to thin your paint, but it does slow down the drying time a great deal. don't mix too much either, or you get the wrinkles seen in the above example, and it seems like it will never dry.

For more mediums check out the Gamblin Mediums page. Its great, full of information and has an interactive guide.

Studio Safety & clean up: Disposing of Mineral spirits and solvents can be a pain in the ass. You should recycle them as "Motor Oil" at a recycling facility. While using them in your home or studio I'll give you some quick tips. You'll need 2 glass jars with lids. Ones your Using jar and ones your used jar. you put your OMS in your using jar, this is what you use as you paint and for clean up. when you're done painting, pour all your dirty paint into your Used jar. once all the pigments settle you can pour off the used, but now clean OMS into your day use jar, and continue using it. This way you use less, waste less, and cost less. Gamblin has a great series of articles on studio safety and tips for painters. I highly recommend subscribing to the Gamblin newsletter.

Don't wash your paint down the sink! water filtration systems for our drinking water, which is recycled from all the shit we flush and wash down our drains, is not effective against filtering out particles as small as cadmium, which is toxic if ingested. to properly dispose of your paint, you can either get a peeling palette where you can let the paint dry and peel it out, or wipe out your palette with paper, then throw that paper away in sealed bags in the garbage. better in a landfill than our drinking water. Paint does less damage in a solid form than a liquid. You can also buy disposable palettes, but I find that quite wasteful anyways.

So that's about it, off the top of my head. :B
If you have more questions, or want to discuss, please drop by my forum! thanks!

Classical Animation - Getting Started - Supplies

On a recent poll, it seems that the crowd watching me on deviantART is mostly animators! Surprising to me, but very interesting none the less. Animation is a very complex art that will require very indepth areas of discussion, so I think the best method to undertake this on a blog is to break it down into tiny steps.

Getting Started
This is always the hardest part for any medium of expression, but it's made more daunting by all the technical aspects of Animation. Beyond the actual physical animation proccess there are many other steps of Pre and Post Production that I haven't even touched on! Someday I'll break down my entire production proccess for you, but in the mean time, Tony white has a great page breaking down the production process for animation here. Its a good read, and pretty interesting to see all the steps. but most people I talk to want to dive into the animation part, so I think this post will be about that.
Lets assume you are wanting to use good old fashioned classical animation on paper. Here is what you will need!

  • An already written storyboarded and shot animatic to work from and filled out dope sheets. (I'll post about this in the future)
  • Animation Paper. This can even be bond paper (printer paper) but really any paper that has a slight translucency to it will do. Don't get the most expensive stuff, thats pointless considering how much you will go through! You might be confused at first by the way the paper is labeled as 10f, 12f, and 16f. What the F stands for is "Field". I'll discuss the importance of that later on, but for now, dont worry about it!
  • Peg Bar.There are 2 basic types of peg bars Acme and Round. Acme is the one with 2 flat pegs, and one round peg, and round is standard 3 hole punch. See the chart I yoinked from Cartoonsupplies.com.I recommend sticking with round to start, since the hole punches for acme are expensive! Very Expensive! Its cheaper to just punch your own bond paper
  • A board or light box, or animation Disc. An animation disc is an investment. if you are sure you want to animate a lot, definitely get one! I recommend the Port-a-disc for the space limited animator. I have it, its beautiful and perfect! it fits 12f paper. It uses ambient light for the light box, or you can slap it over a light box if you feel the need. If you don't have a disc, just tape your pegbar to a slab of Masonite, or board, or a light box. Please note: you do not NEED a light box to animate! the animation is seen by "flipping" the pages, and viewing them. I only ever use light to clean up animation.
  • Pencils! Blue, Red, and graphite! Blue is for Rough animation, Red is for camera information and graphite is for the final clean up. Sanford Col-erase pencils are the best for coloured ones. and (in my opinion) tombow makes the best graphite pencils.
  • Tape. Low tack tape, and masking tape! Low tack is good for repositioning things on a rough if you need to cut something out and reposition it (easier than redrawing!) and masking tape is good for fixing torn peg holes. you can also get reinforcements for that, but why bother? (Guru has 2 boxes! LOL)
So theres all the physical supplies to get started! but theres all that pre and post production I skipped over! I found a website called yourresumesucks.biz that has some really good Free downloadable forms! I was very impressed! it includes not only the dope sheet, but many other forms for running a home studio! I customized mine, and built a single multi-page excel sheet for each of my scenes. It's a great thing to have!

Paperless PLZ!
Paperless work flow? Kudos on you for choosing an earth friendly animation system! I work totally paperless now, yes it is possible to do classical animation, paperless. This is a cheaper alternative to the classical animation. Buying paper, and hell, even storing the animation is sometimes a daunting task! I have several programs I use for my paperless animation

  • Rough & clean animation: I use Plastic animation Paper for all my rough and clean animation. I have the pro version, but for simply rough animation the free version is perfectly fine! I cannont even begin to express how much I enjoy this program. its a light weight extremely friendly program to use! I recomend it to anyone and everyone! I've done a video tutorial on it and more will come.
  • Clean animation alternative: If you only use a free version of PAP (plastic animation paper) then you can export the rough frames from PAP and then open them in photoshop, Gimp or ToonBoom and do the clean animation in there.
  • Digital Ink and Paint: I use Toon Boom Studio for my digital painting. It's fairly easy to use. I've done a tutorial or 2 on this proccess so far, and I will do more!

So thats very basic, again I'll go more indepth later on in future posts. Please feel free to discuss anything in my posts, or promote your stuff in my new Forum! Its new, and needs love. <3

Sunday 8 March 2009

Markers - brands

It seems fitting that my first post be about my passion - Markers.
I've been using them for many years now, and I've learned a lot along the way! I'll give a a run down of all the tools I use with my markers, and the pro's and Con's of each brand of marker or marker related material.

Paper
A lot of people don't fully understand markers, or find them to be difficult to control, and I think its mostly because people are using the wrong papers. The most ideal paper to use, is a bleed-proof marker paper! hands down, its the best!
Its initially off putting to most artists because some of its flimsy thin weak feel, but its really ideal!
I use Letraset Bleedproof paper. It has many benefits! but for my main illustrations I use Aquabee Bleed Proof Marker paper. Its bleed proof but heavier like cardstock so you get to lay down tons of colour without it pooling or blobbing.


  • The most obvious benefit of the letraset is that its bleed-proof. You get crisp smooth lines of vibrant colour, and they don't bleed into each other.
  • The colours blend easily. Because its bleed proof, the paper doesn't absorb the ink immediately, so you can layer colours and blend them together quite easily.
  • Markers last longer. That's right! If you use a heavy paper that is absorbent, you are literally wasting your markers!! As you use the markers, the paper is drawing out more ink than it needs. draining your markers dry! When people complain to me that their markers don't last long, the first thing I ask is "what paper are you using?" and in most cases a change of paper solves that problem! This of course lowers costs.
  • Colourless Blender! Most people use them with success, but there are things you can do on marker paper that you cant do on other papers with the colourless blender. You can actually erase your markers to an extent. I did that a lot on my Stag Drawing Because I was experimenting and reading online about markers at the same time! haha :D
So that's Bleed proof paper, but you can also use other paper. Bristol board is OK, but I wouldn't use it. It pulls a lot more ink, as its an absorbent paper, but it doesn't bleed too much. If you are doing mixed media like adding pencil Crayons (coloured pencils for the Americans) or watercolour with your marker work, this is ideal. the smoother the finish, like a vellum finish is best, since tooth can be a little rough on marker nibs.

Marketing

I have a pet-peeve in regards to how markers are marketed. Every single line of markers I use has at least some reference to M
anga art in their advertising. Give it up already! a Real artist chooses a material based on techniques, styles, and personal preference. We don't pick up markers simply because as a certain genre of style, its dictated that that's the proper use. No, If you are an artist of any style, genre, or walk of life, you choose a material based on how it performs! Worse, is in some cased they market the student lines of the markers as being the Manga artists pens.
Show me how the pen looks on paper, don't show me how to colour a picture of a lolita girl.
(In no way do I think Manga is not art, I like manga, but I think the marketing ploy is terrible)

Markers
Now onto the actual Markers! I've used 6 brands of markers, and 5 of them are ones I still use on a regular basis. Each has pros and con's, which is why I don't stick to one marker brand.

Tria: Letraset has displayed the biggest product self sabotage since coke changed its original recipe. I just keep waiting for Letraset to re-release the Trias as "Tria Classic." I'm losing faith that they will. Having said that, the New line of tria markers is actually truly amazing if you get ones that are fixed. They had batch issues when they released their new marker design that had faulty brush nibs (the ink seemed the wrong consistency to make it through), caps that didn't seal and caps that damaged the chisel nibs. When I wrote and complained about the product to Letraset, they offered me a pack of 25 markers in the zipper case for free, for my trouble, which I gladly accepted. Unfortunately the markers they sent me were from the bad batches so I have very few of those that survived. Unfortunately for them this ruined their credibility. However, I still use and buy them. The new batches are nothing short of brilliant! I got a set of "brights" that seem to all be from the "fixed" batches, and the colours are vibrant, smooth and exactly what I look for in a marker. The Swatch I have posted here is the "r465" colour, the first swatch is the brush tip overlapped slightly and the other swatch is the chisel nib with built up layers. The inks are transparent, alcohol based and non-toxic. Tria has the largest colour range I've ever seen! They base their colours labeling on a Hue, saturation, & luminosity scale. From the website:

HSL is represented as numerical values - meaning accurate colour specification that can be interpreted by a computer.
Most graphic software applications use HSL, so by sharing this method, the Tria colour space works alongside the digital design process.


I believe that the trias are Pigment based inks, so they should be archival, but I don't recall where I heard that, and I couldn't find that information on their website. Trias are refillable by replacing the actual shaft of the pen, and the nibs are replaceable by replacing the nibs as well. It seems like a rather wasteful process to be honest. Why replace the whole shaft, when you can replace the whole pen? it doesn't make much sense to me. So their replacements are nice, but i find them pointless. They also carry a line of inks to match their pen colours, so you can fill brush pens with the ink as well!
So Tria has a great deal of benefits for its use. The only Con is that they've destroyed their reputation with some bad batches that were not corrected quickly enough.

Copic:

Everyone seems to love the
Copics. They sure are nice! they Have a great line of colours (Up to 310+ colours, and growing), and styles of markers. I believe they also made the Brush tip as popular as it is today. My only complaint comes from a comparison. They are not as vibrant as the Trias for a straight primary colour. you can see that this swatch, on the single stroke lines, its barely red at all, its almost pink! and even on the built up swatch, it doesn't have nearly the purity of colour or vibrancy of the Tria. That's my only complaint. Otherwise the colours are amazing! the range is fantastic. The reliability of the product is consistent and I think they have the best reputation of all the markers available. With good cause, I've only had one marker that has upset me, My Africano colour tends to pool in the brush tip when I use it. Its okay though, I just open both caps for a few minutes and equalize the pressure! HA! its a beautiful rich colour. The pens are a good shape and size for holding and prolonged use, and they last a fairly long time with proper use. The actual markers are ciao, Sketch, and wide. each one offering different nibs, all are refillable, and all have changeable nibs! They also have a line of ink as well, so you can refill your markers and they also have a fantastic line of Drawing pens! (I'll save pens for another post!) The inks are dye-based so aren't UV safe, so keep them out of the light!
They're an amazing marker. The con I mentioned are extremely minor and I recommend them to anyone!

They are also more expensive than other markers but you make up the cost 100 times over with the refills. They actually work out to be less expensive over time!

Prismacolour Markers:

I never have much to say about these guy. They are a pretty good marker. they have a good selection of colour, very consistent and very smooth lay down of colour, and ve
ry reliable. Double ended markers, with a chunky chisel and a fine point tip as well. The drawback is the lack of brush tip, but the chisel and fine tips get you a good range of pen strokes from your markers. They're artist quality, and fairly accessible. The awesome thing is that they also have a line of fine line pens for drawing, that are the same as the markers! finally marker proof coloured pens that don't cost a fortune! Again, I'll save this for a pen review.
Non Toxic, and a good range of colours. What more could you ask for really?


Letraset ProMarker:

These are by Letraset, the same company as the Tria. This is their "student" line, but They're every bit as good as the Trias! They have a great set of colours and they lay down smooth and true! my swatch is from a pen thats starting to dry out, haha! but you get the idea, Its a good colour, builds up nicely, and smooth. They ave a fine and chisel nib. I use them mostly for base coats of colour, and they serve me well.
Not much more I can say about them except that they also work with my Letrajet Airbrush system ;)

Touch Markers
These are fairly new to me, and I don't have a swatch. They so far, seem to have really good colour laydown, a good range of colours, but they're pretty expensive here in Vancouver so far, so I haven't had a chance to play yet. i have a grey set thats nice!


Letrajet Marker Airbrush:
Now here is a product thats fun to use! Its an air canister and nozzle you shove a Promarker into and it forces air across the nib creating a rough aibrush effect. with less pressure on the trigger you get a more spatterly look, while if you plunge the trigger down all the way, you get a softer airbrush look! Its great for stenciling little highlights and soft shadows. There are similar products for other lines of markers, but I've yet to try them. This one is pretty cool. It wont replace a real airbrush, but it sure is a neat addition to a marker set!

Marker Care
Taking care of markers is pretty simple. Carefully recap them if you aren't using them, store them laying flat, instead of standing up. I'm of course guilty of leaving mine standing up, but It's better for them to lay down. then the ink doesn't pool into one tip or the other. I've opened markers to have ink run down my hands and arms before. it's fun, but only once. Don't mash the nibs, and show them some love.
If the Pen shafts get too dirty for your likes, you can clean them with colourless blenders, or alcohol, but a dirty marker is a well used marker in my opinion, and I like em dirty!

I did a marker tutorial a while back, maybe someone will find it useful.

This is just the first of many entries on markers so I hope you find this useful!

if you have any marker reviews, tutorials, or information on other brands of markers please feel free to comment and leave links! I'll add them to the post!
Related Posts Plugin for WordPress, Blogger...