Pages

Showing posts with label Animation. Show all posts

Monday, 25 October 2010

Animation Layout

I'm cross posting this from dA, since I thought it would b a good addition to this blog:

As part of Pre -production month on thedevanimationsource, I'm going to be talking about Layout. I've found an old example of a layout I did in school to use as an example, so wherever it says "image example" it should link to an example image of whatever I described.
layout is one of those areas of animation that is barely talked about and it's hard to get real examples of what it actually is!
What is Layout: Essentially a layout artists takes the storyboards and translates each scene into a usable set of drawings for the animators. In the old paper and pencil days they would be kept in a folder and passed onto the animators and background artists, now they'd be stored digitally in most cases in shared folders.

Elements of a layout
The field guide and camera guide, dope sheets, The character poses, the cleaned up background, the overlays or underlays, and effects elements. Every element should be labeled - usually on the bottom right corner - with the artists name, the element name (ani1, ol4, fg1 etc) and the scene number. This way if a stack of paper gets dropped...Lets hope that never happens.

  • Camera Key: Camera Keys are used to show the TV cut off (if applicable) the aspect ratio of the film. It's very similar to the blue lines on comic board, if you're a comic artist. In many cases the poses of characters are indicated on the field guide as well as the order of the various elements in the scene to show which layer overlaps etc. It should also include any camera moves such as a truck in, shake, or pan.
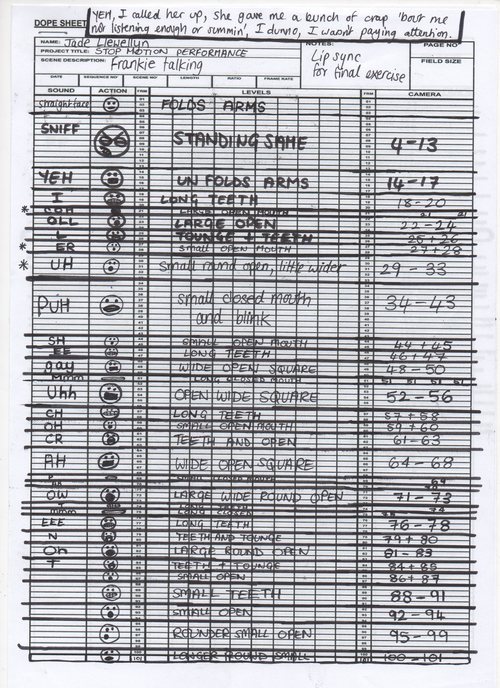
  • Dope Sheets: Or x-sheets, or Exposure sheets. The section of the shows Dope sheet should be included in the layout for each scene.
  • Animation Elements that are added to a layout folder should have a rough and a clean version of each file:
  • Background: The layout artist draws the background. Of course this varies depending on the production. if the background is being done digitally, the layout artists bg would just be the base drawing of the digital background. In many cases though, it's the full ink drawing of the bg, which then would go to the bg painter.
  • Animation poses: The poses from the storyboard of the animation - this isn't necessarily the main key frames - just poses to indicate the position of their character or object in the acting, as well as in the frame.
  • Overlays and underlays: still elements that have to be separated from the background so that objects or animation can pass between them. Things like foreground bushes, or panning objects.

Setting up a layout
Once you have all these elements, you need to put them in order.
The Dope sheet is often attached to the outside of the scene folder along with a mini copy of the storyboard itself - with all the necessary labelling on it. It would also include a list of what's in this folder. Alternatively for a digital layout one could place a txt file in the folder with a list of the items included, then the storyboard could be placed in there. The other elements should be placed in there in Camera order (as outlined in your Camera Key) Clean first, then rough (separate). They could be labeled in whatever way is most comfortable. generally bg1.jpg ol1.jpg is useful enough, but for large productions with many hands a more detailed labelling including scene #'s would be good such as sc3-ol2.jpg (scene 3 overlay 2).
The layout is one of the most crucial steps of any production. It's the first step from translating storyboards into the animation process. It take a high understanding of all aspects of the production process!
I hope this was moderately useful!
Thanks!

Monday, 9 March 2009

Classical Animation - Getting Started - Supplies

On a recent poll, it seems that the crowd watching me on deviantART is mostly animators! Surprising to me, but very interesting none the less. Animation is a very complex art that will require very indepth areas of discussion, so I think the best method to undertake this on a blog is to break it down into tiny steps.

Getting Started
This is always the hardest part for any medium of expression, but it's made more daunting by all the technical aspects of Animation. Beyond the actual physical animation proccess there are many other steps of Pre and Post Production that I haven't even touched on! Someday I'll break down my entire production proccess for you, but in the mean time, Tony white has a great page breaking down the production process for animation here. Its a good read, and pretty interesting to see all the steps. but most people I talk to want to dive into the animation part, so I think this post will be about that.
Lets assume you are wanting to use good old fashioned classical animation on paper. Here is what you will need!

  • An already written storyboarded and shot animatic to work from and filled out dope sheets. (I'll post about this in the future)
  • Animation Paper. This can even be bond paper (printer paper) but really any paper that has a slight translucency to it will do. Don't get the most expensive stuff, thats pointless considering how much you will go through! You might be confused at first by the way the paper is labeled as 10f, 12f, and 16f. What the F stands for is "Field". I'll discuss the importance of that later on, but for now, dont worry about it!
  • Peg Bar.There are 2 basic types of peg bars Acme and Round. Acme is the one with 2 flat pegs, and one round peg, and round is standard 3 hole punch. See the chart I yoinked from Cartoonsupplies.com.I recommend sticking with round to start, since the hole punches for acme are expensive! Very Expensive! Its cheaper to just punch your own bond paper
  • A board or light box, or animation Disc. An animation disc is an investment. if you are sure you want to animate a lot, definitely get one! I recommend the Port-a-disc for the space limited animator. I have it, its beautiful and perfect! it fits 12f paper. It uses ambient light for the light box, or you can slap it over a light box if you feel the need. If you don't have a disc, just tape your pegbar to a slab of Masonite, or board, or a light box. Please note: you do not NEED a light box to animate! the animation is seen by "flipping" the pages, and viewing them. I only ever use light to clean up animation.
  • Pencils! Blue, Red, and graphite! Blue is for Rough animation, Red is for camera information and graphite is for the final clean up. Sanford Col-erase pencils are the best for coloured ones. and (in my opinion) tombow makes the best graphite pencils.
  • Tape. Low tack tape, and masking tape! Low tack is good for repositioning things on a rough if you need to cut something out and reposition it (easier than redrawing!) and masking tape is good for fixing torn peg holes. you can also get reinforcements for that, but why bother? (Guru has 2 boxes! LOL)
So theres all the physical supplies to get started! but theres all that pre and post production I skipped over! I found a website called yourresumesucks.biz that has some really good Free downloadable forms! I was very impressed! it includes not only the dope sheet, but many other forms for running a home studio! I customized mine, and built a single multi-page excel sheet for each of my scenes. It's a great thing to have!

Paperless PLZ!
Paperless work flow? Kudos on you for choosing an earth friendly animation system! I work totally paperless now, yes it is possible to do classical animation, paperless. This is a cheaper alternative to the classical animation. Buying paper, and hell, even storing the animation is sometimes a daunting task! I have several programs I use for my paperless animation

  • Rough & clean animation: I use Plastic animation Paper for all my rough and clean animation. I have the pro version, but for simply rough animation the free version is perfectly fine! I cannont even begin to express how much I enjoy this program. its a light weight extremely friendly program to use! I recomend it to anyone and everyone! I've done a video tutorial on it and more will come.
  • Clean animation alternative: If you only use a free version of PAP (plastic animation paper) then you can export the rough frames from PAP and then open them in photoshop, Gimp or ToonBoom and do the clean animation in there.
  • Digital Ink and Paint: I use Toon Boom Studio for my digital painting. It's fairly easy to use. I've done a tutorial or 2 on this proccess so far, and I will do more!

So thats very basic, again I'll go more indepth later on in future posts. Please feel free to discuss anything in my posts, or promote your stuff in my new Forum! Its new, and needs love. <3
Related Posts Plugin for WordPress, Blogger...